学习unity的ecs框架
ecs是基于流进行处理的框架,游戏内的每一个基本单元都是一个实体,每个实体又由一个或多个组件构成,每个组件仅仅包含代表其特性的数据(即在组件中没有任何方法),例如:移动相关的组件
MoveComponent包含速度、位置、朝向等属性,一旦一个实体拥有了MoveComponent组件便可以认为它拥有了移动的能力,系统便是来处理拥有一个或多个相同组件的实体集合的工具,其只拥有行为(即在系统中没有任何数据),在这个例子中,处理移动的系统仅仅关心拥有移动能力的实体,它会遍历所有拥有MoveComponent组件的实体,并根据相关的数据(速度、位置、朝向等),更新实体的位置。如果有Spring相关经验就更好理解了,我这次介绍的ecs也存在依赖注入相关方面实体与组件是一个一对多的关系,实体拥有怎样的能力,完全是取决于其拥有哪些组件,通过动态添加或删除组件,可以在(游戏)运行时改变实体的行为。
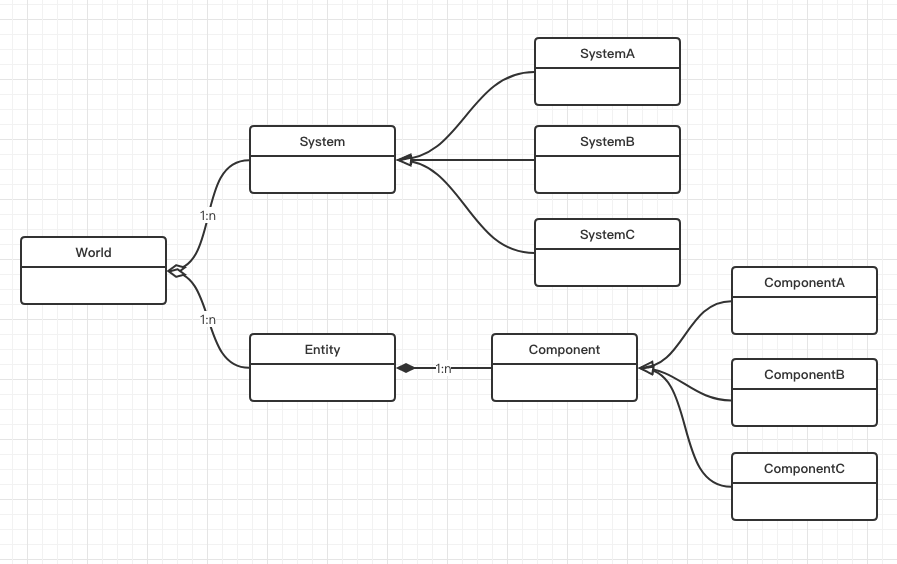
ecs介绍
ecs框架大纲图:
我们这会不介绍框架的源码,而是通过一个弹球小游戏实例,由浅入深,来为大家讲解某个ecs框架用法
具体游戏下载地址在这里:cadfoot/unity-ecs-bubble-shooter (github.com)
首先我们先来理解框架,然后转到游戏代码来深入浅出。
框架理解
1.安装方法
使用源码
这个仓库可以直接通过git 链接来安装,只需要在Packages/manifest.json加入下面这一行就好
"com.leopotam.ecs": "https://github.com/Leopotam/ecs.git",
默认情况下将会安装上一个发行版,如果你需要最新正在开发的版本(“ trunk/developing” ),将#develp增加到链接的后面
"com.leopotam.ecs": "https://github.com/Leopotam/ecs.git#develop",
使用源码
如果你不想用这种这种方式安装,可以下载源码并使用
主要部分
组件-Component
包含数据和少量(没有)逻辑
struct WeaponComponent {
    public int Ammo;
    public string GunName;
}
注意! 不要忘记手动初始化每个新组件的所有字段- 当回收到流时,它们将被重置为默认值。
实体-Entity
组件的容器,通过 实现EcsEntity 包装内部标识符
//在ecs框架的世界中(world字段)创建一个新的entity(实体)
EcsEntity entity = _world.NewEntity ();

// Get() 返回一个entity内的组件 ,如果组件不存在,则会新增一个
ref Component1 c1 = ref entity.Get<Component1> ();
ref Component2 c2 = ref entity.Get<Component2> ();

// Del()从ecs移除一个组件.如果它是最后一个组件,ecs也会自动将其移除
entity.Del<Component2> ();

//将组件替换成一个新的组件,如果组件不存在,则会新加入一个
var weapon = new WeaponComponent () { Ammo = 10, GunName = "Handgun" };
entity.Replace (weapon);

// 用 Replace() 方法你可以约束组件的创造:
var entity2 = world.NewEntity ();
entity2.Replace (new Component1 { Id = 10 }).Replace (new Component2 { Name = "Username" });

// 任意 entity 都可以被复制(包括其中所有组件):
var entity2Copy = entity2.Copy ();

// 任意 组件可以被合入/移动到另外一个entity(原始的将会被销毁)
var newEntity = world.NewEntity ();
entity2Copy.MoveTo (newEntity); // 所有 entity2Copy  的组件将会移动到newEntity, entity2Copy 将会销毁(destroyed).

// 任意 entity 可以被销毁. 所有entity上的组件将会被先移除,然后entity再销毁
entity.Destroy ();
注意! Entities 没有 components 将会自动删除,在上一个
EcsEntity.Del()调用时.
系统-System
处理对应实体entities逻辑的容器,如果是User 类的话 就应该实现 IEcsInitSystem, IEcsDestroySystem, IEcsRunSystem (或者其它) 接口:
class UserSystem : IEcsPreInitSystem, IEcsInitSystem, IEcsRunSystem, IEcsDestroySystem, IEcsPostDestroySystem {
    public void PreInit () {
        //将会在EcsSystems.Init()以及IEcsInitSystem.Init之前被调用.
    }

    public void Init () {
        //将会在 EcsSystems.Init() 调用时执行一次
    }

    public void Run () {
        //将会在 每一次EcsSystems.Run()调用时执行
    }

    public void Destroy () {
        //将会在 EcsSystems.Destroy() 调用时执行一次
    }

    public void PostDestroy () {
        // 将会在 EcsSystems.Destroy() 以及在IEcsDestroySystem.Destroy之后执行
    }
}
数据注入
所有ecs系统底下兼容EcsWorld 和 EcsFilter<T> 的字段将会自动初始化 (自动注入):
class HealthSystem : IEcsSystem {
    // 这下面都是自动注入字段
    EcsWorld _world = null;
    EcsFilter<WeaponComponent> _weaponFilter = null;
}
任何通用类型的实例通过EcsSystems.Inject() 方法也可以被注入到任意一个系统中
class SharedData {
    public string PrefabsPath;
}
...
var sharedData = new SharedData { PrefabsPath = "Items/{0}" };
var systems = new EcsSystems (world);
systems
    .Add (new TestSystem1 ())
    .Inject (sharedData)
    .Init ();
每一个系统都将会扫描兼容字段(可能包含或者没有的),并用一个合适的值去初始化
class TestSystem1 : IEcsInitSystem {
    // auto-injected fields.
    SharedData _sharedData;

    public void Init() {
        var prefabPath = string.Format (_sharedData.Prefabspath, 123);
        // prefabPath = "Items/123" here.
    }
}
特殊类型-Special classes
Ecs过滤器-EcsFilter
保持用特定的组件列表过滤过的实体entity容器:
class WeaponSystem : IEcsInitSystem, IEcsRunSystem {
    // 自动注入字段:EcsWorld 实例和 ecs过滤器
    EcsWorld _world = null;
    // We wants to get entities with "WeaponComponent" and without "HealthComponent".
    EcsFilter<WeaponComponent>.Exclude<HealthComponent> _filter = null;

    public void Init () {
        _world.NewEntity ().Get<WeaponComponent> ();
    }

    public void Run () {
        foreach (var i in _filter) {
            //  包括WeaponComponent的entity.
            ref var entity = ref _filter.GetEntity (i);

            // Get1 将返回 一个绑定"WeaponComponent"的链接.
            ref var weapon = ref _filter.Get1 (i);
            weapon.Ammo = System.Math.Max (0, weapon.Ammo - 1);
        }
    }
}
注意! 如果你想销毁部分数据(实体或组件),你不应该在这个过滤器的foreach循环之外对任何过滤器数据使用’ ref ‘修饰符——它会破坏内存完整性。
过滤器约束的所有组件 可以通过 EcsFilter.Get1(), EcsFilter.Get2() ..快速访问,与它们在过滤器类型声明中使用的顺序相同
如果不需要快速访问 (比如基于标记但没有数据的组件), 组件可以实现 IEcsIgnoreInFilte 接口减少内存使用并提升性能
struct Component1 { }

struct Component2 : IEcsIgnoreInFilter { }

class TestSystem : IEcsRunSystem {
    EcsFilter<Component1, Component2> _filter = null;

    public void Run () {
        foreach (var i in _filter) {
            // its valid code.
            ref var component1 = ref _filter.Get1 (i);

            // its invalid code due to cache for _filter.Get2() is null for memory / performance reasons.
            ref var component2 = ref _filter.Get2 (i);
        }
    }
}
注意: 一个过滤器支持最多6个“include”约束和最多2个”exclude” 约束. 少量的约束可以提供更棒的性能
注意: 如果你尝试使用二种过滤器在不同命令中对同一个组件进行操作, 你将得到
冲突类型的异常,但这仅仅是在debug模式下显示,在release模式下,这种检查将被跳过
Ecs世界-EcsWorld
包括所有实体/组件的根节点容器。在孤立的环境的下进行工作
注意: 当instance不再被使用后,不要忘记调用
EcsWorld.Destroy()
Ecs系统-EcsSystems
用作处理EcsWorld 实例的系统组合:
class Startup : MonoBehaviour {
    EcsWorld _world;
    EcsSystems _systems;

    void Start () {
        // 创建ecs环境
        _world = new EcsWorld ();
        _systems = new EcsSystems (_world)
            .Add (new WeaponSystem ());
        _systems.Init ();
    }

    void Update () {
        // 处理所有依赖系统
        _systems.Run ();
    }

    void OnDestroy () {
        // 销毁系统逻辑组.
        _systems.Destroy ();
        // 销毁世界
        _world.Destroy ();
    }
}
EcsSystems 实例可以被作为嵌入的系统使用(任意的 IEcsInitSystem, IEcsRunSystem类型, ecs 行为是被支持的):
// 初始化
var nestedSystems = new EcsSystems (_world).Add (new NestedSystem ());

//这里不要调用 nestedSystems.Init(),根系统将会自动调用
var rootSystems = new EcsSystems (_world).Add (nestedSystems);
rootSystems.Init ();

// 循环更新
// 这里不要调用nestedSystems.Run(),根系统将会自动调用
rootSystems.Run ();

// 销毁
// 这里不要调用nestedSystems.Destroy(),根系统将会自动调用
rootSystems.Destroy ();
任意的 IEcsRunSystem or EcsSystems 实例 可以在实时处理中被enabled(开启)和disabled(关闭)
class TestSystem : IEcsRunSystem {
    public void Run () { }
}
var systems = new EcsSystems (_world);
systems.Add (new TestSystem (), "my special system");
systems.Init ();
var idx = systems.GetNamedRunSystem ("my special system");

//state默认值是true,所有系统默认是active
var state = systems.GetRunSystemState (idx);

// 在执行过程中关闭系统
systems.SetRunSystemState (idx, false);
引擎集成-Engine integration
Unity
Tested on unity 2019.1 (not dependent on it) and contains assembly definition for compiling to separate assembly file for performance reason.
Unity editor integration 包括代码案例和debug窗口
其他引擎-Custom engine
需要框架支持C# 7.3或者更高
代码实例-每一部分都被在引擎工作流合适的位置持续化集成
using Leopotam.Ecs;

class EcsStartup {
    EcsWorld _world;
    EcsSystems _systems;

    // Initialization of ecs world and systems.
    void Init () {
        _world = new EcsWorld ();
        _systems = new EcsSystems (_world);
        _systems
            // register your systems here, for example:
            // .Add (new TestSystem1 ())
            // .Add (new TestSystem2 ())

            // register one-frame components (order is important), for example:
            // .OneFrame<TestComponent1> ()
            // .OneFrame<TestComponent2> ()

            // inject service instances here (order doesn't important), for example:
            // .Inject (new CameraService ())
            // .Inject (new NavMeshSupport ())
            .Init ();
    }

    // Engine update loop.
    void UpdateLoop () {
        _systems?.Run ();
    }

    // Cleanup.
    void Destroy () {
        if (_systems != null) {
            _systems.Destroy ();
            _systems = null;
            _world.Destroy ();
            _world = null;
        }
    }
}
项目理解
我们来看看案例的代码,这样更好理解依赖注入的观念
首先具体来看看Startup这个类,我们通过这个类来了解ecs的基本写法,上面我们提到过ecs是由多个系统 去处理实体,而实体的获取是通过组件进行获得的,具体获得方式就是autowire完成(依赖注入)
依赖注入:整个项目需要获取实体的变量会通过‘流’来自动获取,玩家只需要将变量放置在框架流中,就无需关注其中细节,直接可以使用
        private void Start()
        {
            Application.targetFrameRate = 60;

            _world = new EcsWorld();
            _systems = new EcsSystems(_world);
#if UNITY_EDITOR
            //Leopotam.Ecs.UnityIntegration.EcsWorldObserver.Create(_world);
            //Leopotam.Ecs.UnityIntegration.EcsSystemsObserver.Create(_systems);
#endif
            _systems
                .Add(new BoardInitSystem())
                .Add(new CameraInitSystem())
                .Add(new BackgroundInitSystem())
                .Add(new BoardPhysicsBoundsInitSystem())

                .Add(new InputSystem())

                .Add(new TrajectorySystem())
                .Add(new NextBubbleSystem())

                .Add(new BubbleConnectionSystem())
                .Add(new BubbleFallSystem())

                .Add(new BubbleMergeSystem())
                .Add(new BubbleExplodeSystem())

                .Add(new ShootSystem())

                .Add(new BubbleFlowSystem())

                .Add(new NextBubbleViewSystem())
                .Add(new CreateBubbleViewSystem())
                .Add(new PredictionViewUpdateSystem())
                .Add(new TrajectoryViewUpdateSystem())
                .Add(new BubbleFallDeathSystem())

                .Add(new BubbleViewMergeSystem())
                .Add(new BubbleViewMoveSystem())
                .Add(new BubbleViewFlySystem())
                .Add(new BubbleViewFallSystem())
                .Add(new BubbleViewShakeSystem())

                .Add(new MergeTextSpawnSystem())
                .Add(new PerfectNotificationSystem())
                .Add(new ComboMergeNotificationSystem())

                .Add(new BubbleViewTweeningMarkSystem())
                .Add(new BubbleCompleteMergeSystem())

                .Add(new BubbleViewHangingDestroySystem())

                .Add(new InputClearSystem())
                .Add(new TrajectoryClearSystem())

                .OneFrame<Prediction>()
                .OneFrame<Connected>()
                .OneFrame<Created>()
                .OneFrame<WorldPosition>()
                .OneFrame<Destroyed>()
                .OneFrame<New>()

                .Inject(GetComponent<ISceneContext>())
                .Inject((IConfig)_config)
                .Inject((IRandomService)new RandomService(_useSeed ? _randomSeed : (int?) null))

                .Init();
        }
        Application.targetFrameRate = 60;

        _world = new EcsWorld();
        _systems = new EcsSystems(_world);
这三行代码主要用来实例化ecs,没什么好解释的,通过这个构建了ecs系统
待续…