逆袭,从0开始解读Laya源代码(2)
- 上一讲我们讲解了Laya的Animation的模块,这一期界面我们将对Mesh.ts做更多考量
前面的教程: https://drinker.site/2020/11/02/DecipheringLayaSourceCode0.html
https://drinker.site/2020/11/09/DecipheringLayaSourceCode1.htmllaya官方案例:https://ldc2.layabox.com/doc/?language=zh&nav=zh-ts-0-3-4
1.研究Laya代码
1.了解框架的思维导图
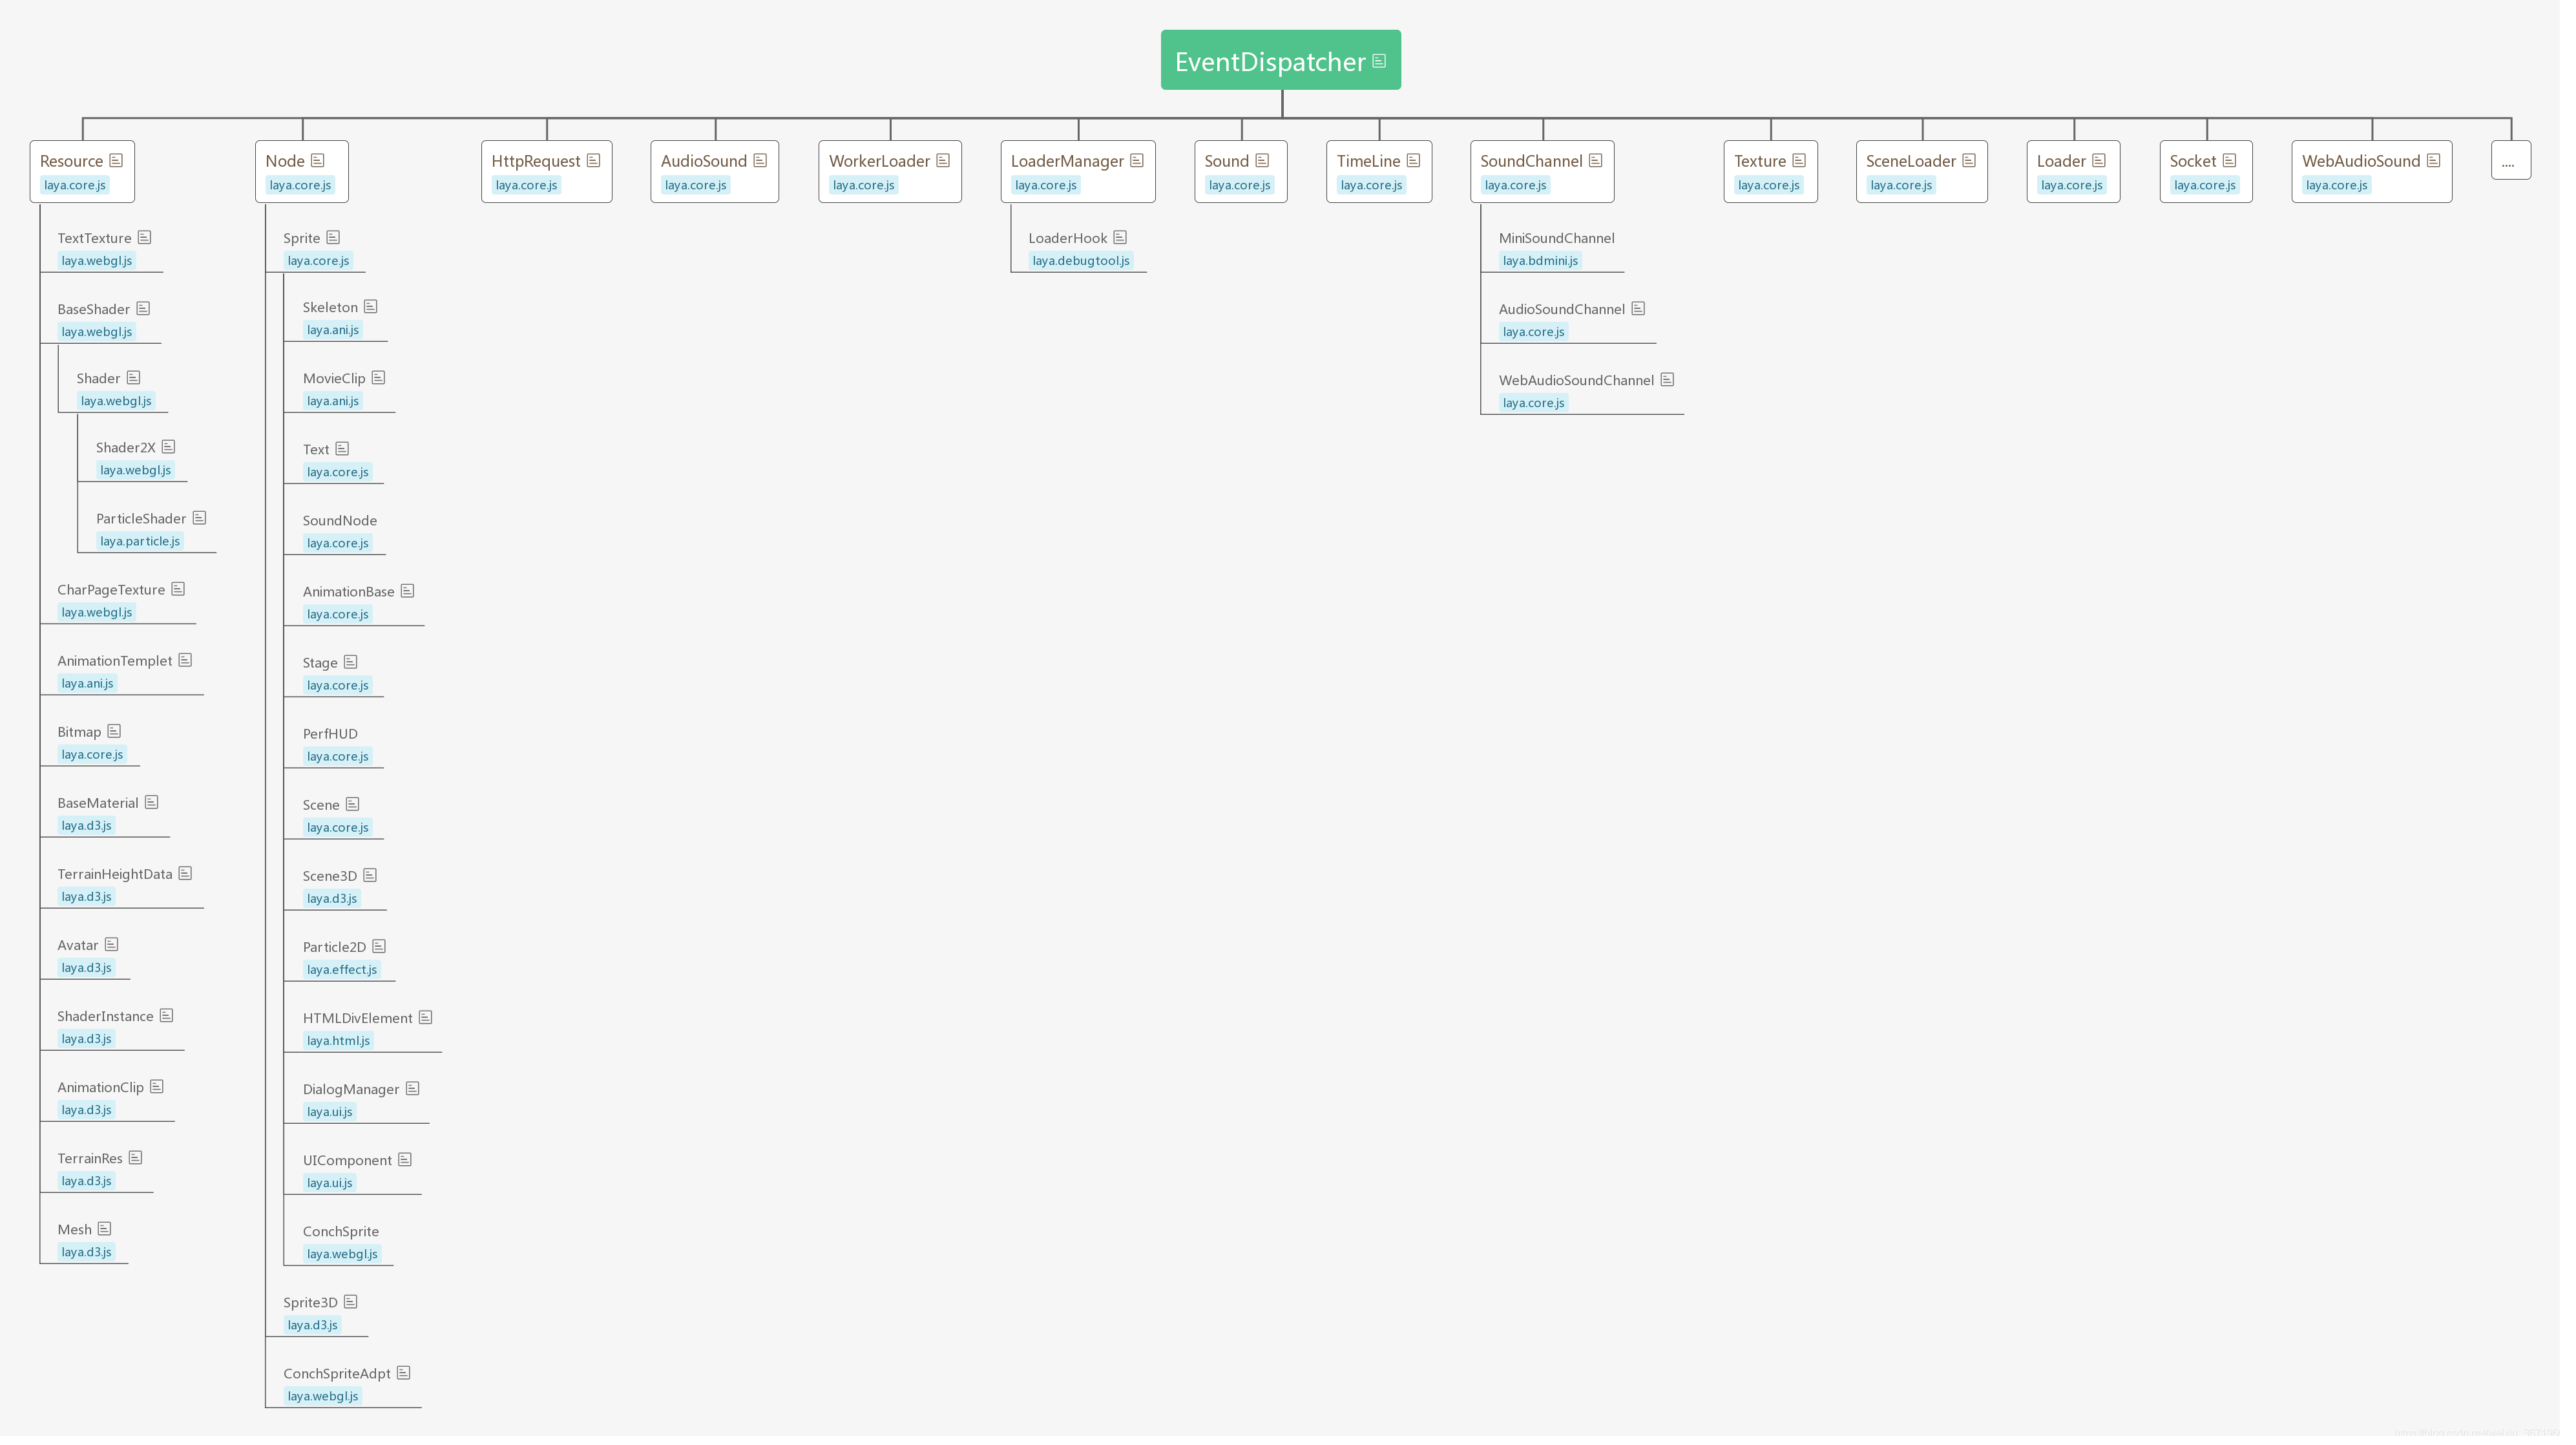
2.了解Mesh,以及laya渲染3d的流程
首先我们还是来看看定义的一些属性类
  /**Mesh资源。*/

  static MESH: string = "MESH";


  /** @internal */

  private _tempVector30: Vector3 = new Vector3()

  /** @internal */

  private _tempVector31: Vector3 = new Vector3();

  /** @internal */

  private _tempVector32: Vector3 = new Vector3();

  /** @internal */

  private static _nativeTempVector30: number;

  /** @internal */

  private static _nativeTempVector31: number;

  /** @internal */

  private static _nativeTempVector32: number;、
前面是定义_tempVector30、_tempVector31、_tempVector32、_nativeTempVector30、_nativeTempVector31、_nativeTempVector32这么一些顶点类,后面nativeTempVector将在init中被使用上
	/**
 	* @internal
 	*/
	static __init__(): void {
		var physics3D: any = Physics3D._bullet;
		if (physics3D) {
			Mesh._nativeTempVector30 = physics3D.btVector3_create(0, 0, 0);
			Mesh._nativeTempVector31 = physics3D.btVector3_create(0, 0, 0);
			Mesh._nativeTempVector32 = physics3D.btVector3_create(0, 0, 0);
		}
	}
这里是一系列的初始化,但是并没有具体实际意义的值,所以我们就是逐一查看引用,先查出_nativeTempVector30的引用方法,我们会发现 _ getPhysicMesh()
	/**
	 * @internal
	 */
	_getPhysicMesh(): any {
		if (!this._btTriangleMesh) {
			var bt: any = Physics3D._bullet;
			var triangleMesh: number = bt.btTriangleMesh_create();//TODO:独立抽象btTriangleMesh,增加内存复用
			var nativePositio0: number = Mesh._nativeTempVector30;
			var nativePositio1: number = Mesh._nativeTempVector31;
			var nativePositio2: number = Mesh._nativeTempVector32;
			var position0: Vector3 = this._tempVector30;
			var position1: Vector3 = this._tempVector31;
			var position2: Vector3 = this._tempVector32;

			var vertexBuffer: VertexBuffer3D = this._vertexBuffer;
			var positionElement: VertexElement = this._getPositionElement(vertexBuffer);
			var verticesData: Float32Array = vertexBuffer.getFloat32Data();
			var floatCount: number = vertexBuffer.vertexDeclaration.vertexStride / 4;
			var posOffset: number = positionElement._offset / 4;

			var indices: Uint16Array = this._indexBuffer.getData();//TODO:API修改问题
			for (var i: number = 0, n: number = indices.length; i < n; i += 3) {
				var p0Index: number = indices[i] * floatCount + posOffset;
				var p1Index: number = indices[i + 1] * floatCount + posOffset;
				var p2Index: number = indices[i + 2] * floatCount + posOffset;
				position0.setValue(verticesData[p0Index], verticesData[p0Index + 1], verticesData[p0Index + 2]);
				position1.setValue(verticesData[p1Index], verticesData[p1Index + 1], verticesData[p1Index + 2]);
				position2.setValue(verticesData[p2Index], verticesData[p2Index + 1], verticesData[p2Index + 2]);

				Utils3D._convertToBulletVec3(position0, nativePositio0, true);
				Utils3D._convertToBulletVec3(position1, nativePositio1, true);
				Utils3D._convertToBulletVec3(position2, nativePositio2, true);
				bt.btTriangleMesh_addTriangle(triangleMesh, nativePositio0, nativePositio1, nativePositio2, true);
			}
			this._btTriangleMesh = triangleMesh;
		}
		return this._btTriangleMesh;
	}
这个类是获取模型的所有三角面,具体调用时候是通过这些语句来实现的
			var indices: Uint16Array = this._indexBuffer.getData();//TODO:API修改问题
			for (var i: number = 0, n: number = indices.length; i < n; i += 3) {
				var p0Index: number = indices[i] * floatCount + posOffset;
				var p1Index: number = indices[i + 1] * floatCount + posOffset;
				var p2Index: number = indices[i + 2] * floatCount + posOffset;
				position0.setValue(verticesData[p0Index], verticesData[p0Index + 1], verticesData[p0Index + 2]);
				position1.setValue(verticesData[p1Index], verticesData[p1Index + 1], verticesData[p1Index + 2]);
				position2.setValue(verticesData[p2Index], verticesData[p2Index + 1], verticesData[p2Index + 2]);

				Utils3D._convertToBulletVec3(position0, nativePositio0, true);
				Utils3D._convertToBulletVec3(position1, nativePositio1, true);
				Utils3D._convertToBulletVec3(position2, nativePositio2, true);
				bt.btTriangleMesh_addTriangle(triangleMesh, nativePositio0, nativePositio1, nativePositio2, true);
			}
			this._btTriangleMesh = triangleMesh;
这里调用了_indexBuffer,我们看看它的赋值引用,我们可以看到一个这样的方法 setIndices,这里传入了网格格式以及网格索引
setIndices(indices: Uint8Array | Uint16Array | Uint32Array): void {
var format: IndexFormat;
if (indices instanceof Uint32Array)
format = IndexFormat.UInt32;
else if (indices instanceof Uint16Array)
format = IndexFormat.UInt16;
else if (indices instanceof Uint8Array)
format = IndexFormat.UInt8;
var indexBuffer: IndexBuffer3D = this._indexBuffer;
if (this._indexFormat !== format || indexBuffer.indexCount !== indices.length) {//format chang and length chang will recreate the indexBuffer
indexBuffer.destroy();
this._indexBuffer = indexBuffer = new IndexBuffer3D(format, indices.length, LayaGL.instance.STATIC_DRAW, this._isReadable);
}
indexBuffer.setData(indices);
this._indexFormat = format;
}
如果你之前看过一些webGL的教程,这里会有一种很强的既视感,就是用其渲染多边形,我放出我囤积许久的csdn教程 :https://blog.csdn.net/lufy_Legend
实际上按照理解,这块其实也就是包装好的WebGl而已…Mesh类是为了更方便的去调用,所以我们直接看看Mesh的引用
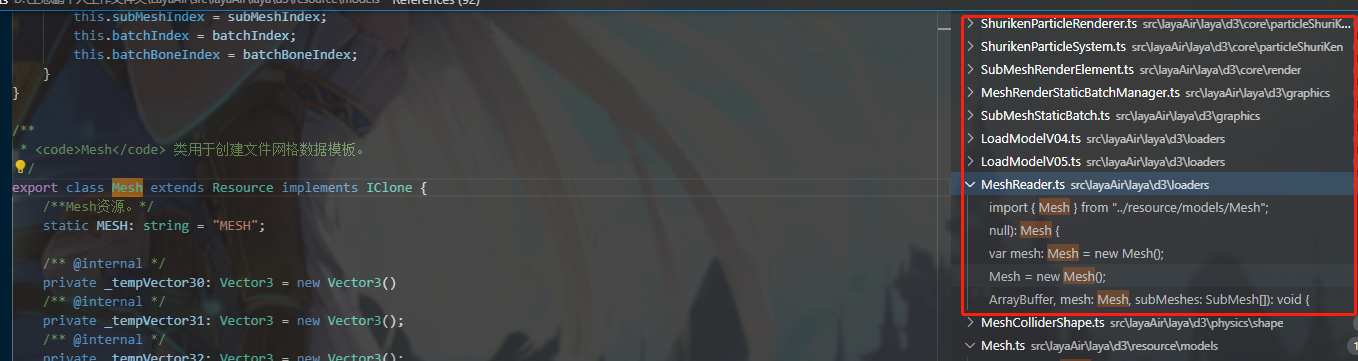
可以看到一堆render对象,我们观察调用逻辑可以从meshRenderer调用到MeshSprite3D,这里基本上涵盖了所有这块的逻辑,具体我就不作过多阐述了,大家可以自行进行学习,可能在下一讲SkyBox里面进行分析(如果有的话)
2.接下来该怎么做
接下来就看大家的了,这个教程做到这里,应该能教会了大家最基础的学习方式,因为本人基础薄弱的问题,存在许多纰漏和错误,望谅解,希望能与大家共同进步,我也继续努力。争取对这个源码理解更深入后出新的内容